


Glazing putty is a stiff, dough-like compound that beds a pane of glass into its frame and weatherproofs the joint. In its traditional form it is nothing but powdered chalk and linseed oil — no solvent, no plastic, no cure chemistry beyond the slow reaction between oil and air.
That simplicity is why it is still specified in 2026 on everything from Georgian sashes to garden greenhouses, and why it frustrates so many people who use it for the first time. Putty does not behave like filler or sealant. It does not "dry". It cannot be rushed, it cannot be left unpainted, and it will not stick to bare timber for long. Understand the handful of rules below and it is one of the easiest and most forgiving materials in building. Ignore them and no amount of skill with a knife will save the job.
What glazing putty actually does
A putty-glazed window asks the putty to do four jobs at once:
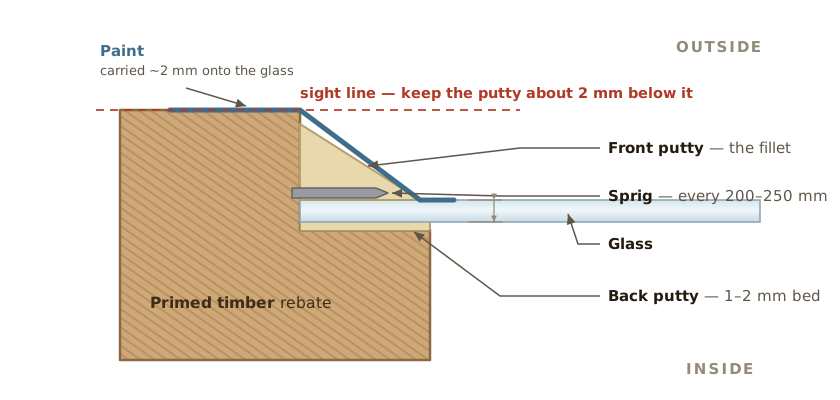
- It beds the glass. A thin layer behind the pane — the back putty or back bedding — takes up the unevenness of the rebate so the glass sits on a continuous, slightly compliant cushion instead of on three hard high spots. That is what stops panes cracking when the frame moves.
- It seals the joint. The external fillet sheds water off the glass and away from the end grain of the rebate, which is the most rot-prone timber in the whole window.
- It holds the glass in place — though only in combination with sprigs, the small headless pins driven into the rebate. Putty is not an adhesive and should never be relied on as one.
- It gives the window its look. The clean, thin bevel of a putty line, running right up to the sight line, is a large part of why a period window reads as a period window. Timber glazing beads look bulkier at every scale.
Two words appear throughout this guide and are worth pinning down now. The rebate is the L-shaped step machined into the frame that the glass sits in: an upstand at the glass edge and a seat behind it. The sight line is the inner arris of that rebate — the line you see when you look at the window square on. Everything about a good putty job is arranged around finishing the fillet just below the sight line so that from indoors you see almost no putty at all.
What it is made of
Traditional glazing putty is whiting — finely ground natural chalk, essentially calcium carbonate — kneaded into linseed oil until it forms a stiff paste. The proportions vary between makers, but chalk dominates by weight; the oil is the binder and the whole of the cure chemistry.
Linseed oil is a drying oil. It does not evaporate. Exposed to air it takes up oxygen and polymerises, gradually cross-linking into a tough solid — the same reaction that hardens linseed oil paint, and the same reaction that makes oily rags a genuine fire risk (see the safety section). Three consequences follow, and they explain most of what putty does:
- It cures from the outside in. A skin forms in a couple of days; the core behind it can still be soft months later. That is normal and desirable — a fully rigid fillet would crack the first time the frame moved.
- It needs its oil. Anything that removes oil from the putty — bare absorbent timber, a hot dry rebate, a summer of UV — stops the cure and turns the fillet to crumbling chalk.
- It never truly stops. Fifty-year-old putty is harder than five-year-old putty. This is why hacking out old putty is such physical work, and why heat helps.
Historic putties were not always so innocent. Nineteenth- and early twentieth-century recipes commonly carried white lead to improve elasticity and durability, and some mid-century compounds contained asbestos fibre for the same reason. Modern UK putty contains neither, but the putty already on a pre-war window may contain both. Treat old material accordingly.
The types of putty, honestly compared
"Glazing putty" in a UK merchant covers at least five different materials. They are not interchangeable.
1. Linseed oil putty (multi-purpose)
The traditional material, and the default for single glass in primed timber. Sold as "linseed oil putty" or "multi-purpose putty" by Bartoline, Everbuild, Evo-Stik and Hodgson Sealants among others, usually in natural (off-white) and brown. UK products are still made to the recipe set out in BS 544:1969, Specification for linseed oil putty for use in wooden frames — a standard now formally withdrawn but still cited on data sheets and still the practical benchmark.
Multi-purpose putty will also glaze primed steel and, with a suitable sealer first, glass into stone or concrete surrounds. It is over-paintable, repairable, endlessly re-workable, and costs a few pounds a kilogram.
2. Metal casement putty
A different oil blend, formulated for non-absorbent frames: primed steel casements of the Crittall type, and hardwoods that are too dense to take up oil. The distinction matters. Multi-purpose putty relies on the frame drawing a little oil out of it to begin the cure at the back; on steel nothing is drawn out, so a putty designed for timber cures unevenly and can stay greasy against the metal. Metal casement putty is made to set without that help. It skins in roughly two to four days outdoors and works between +5 °C and +30 °C.
3. Modern putty-replacement sealants
Cartridge-gun compounds — the best known in the UK is Repair Care's Dry Seal MP, a modified-silane polymer — that are gunned in and tooled to a bevel like putty, but cure in hours rather than weeks and stay permanently elastic. They are over-paintable the same day, and, unlike linseed putty, they are tested as compatible with laminated glass and sealed double-glazed units. They cost several times as much per metre, cannot be re-worked once skinned, and do not read quite like putty on a historic building.
4. Butyl and glazing tapes
Pre-formed strips and non-setting butyl compounds, used for bedding sealed units and in factory glazing. They never harden, so they accommodate movement indefinitely, and they are the normal partner for a bead-glazed system rather than a putty-faced one.
5. Silicone and acrylic "glazing compounds"
Silicone is an excellent bedding material for sealed units and a poor imitation of putty on a period window: it cannot be knifed to a crisp arris, and paint will not adhere to it. Water-based acrylic glazing compounds skin quickly and paint quickly, but they shrink as the water leaves and have a much shorter life outdoors. Neither belongs on a historic sash.
The one-line version: single glass in primed timber → linseed oil putty. Single glass in primed steel → metal casement putty. Sealed units, laminated glass, or a bead-glazed frame → not putty at all.
Which putty for which job
| Situation | Use | Why |
|---|---|---|
| Single glass, primed softwood sash or casement | Linseed oil putty | The material the joinery was designed around; repairable for a century |
| Single glass, dense hardwood | Metal casement putty | Hardwood absorbs almost no oil, so a timber putty cures poorly |
| Single glass, primed steel casement | Metal casement putty | Formulated to cure against a non-absorbent surface |
| Sealed double-glazed unit | Tape, silicone or Dry Seal MP | Linseed oil destroys the unit's edge seal |
| Laminated or acoustic glass | Putty-replacement sealant | Oil attacks the PVB interlayer at the edge |
| Bead-glazed frame | Bedding sealant behind the bead | Putty is not designed to work under a bead |
| Greenhouse, shed, garage window | Linseed oil putty | Cheap, forgiving, and easy to touch up |
| Leaded light / stained glass panel | Leaded-light cement | A different, thinner material brushed into the cames — not glazing putty |
Where putty must never go
Every UK putty data sheet carries the same three prohibitions, and they are worth taking literally.
- Not on insulating (sealed) glass units. The oil migrates into the unit's perimeter seal and degrades it. The unit fogs — often within a year or two — and no amount of re-puttying brings it back. This is the single most expensive putty mistake, and it is made constantly when someone re-glazes an old sash with a slimline unit and reaches for the tub out of habit. Slim units for heritage windows are bedded and fronted with the sealant their maker specifies.
- Not directly against laminated glass. Oil attacks the plastic interlayer at the exposed edge and can cause it to delaminate and haze.
- Not in bead-glazed systems. A rebate designed for a timber or metal bead has neither the depth nor the geometry for a knifed fillet, and putty trapped behind a bead cannot cure or be maintained.
Add one more, from experience rather than the data sheet: not on bare, unprimed timber — see below.
Preparation: the part that decides everything
If putty fails early, preparation is almost always the reason.
Prime the rebate. Always.
Bare softwood is thirsty. Put fresh putty against it and the timber pulls the linseed oil straight out of the material's back face, leaving a dry, chalky ring that never cures and drops out in sheets a season or two later. Glaziers call it oil starvation and it is the number one cause of premature putty failure.
One coat of a solvent-borne wood primer — the traditional reference is BS 5358 — is enough. It seals the timber without sealing it so completely that no bond forms. Prime the whole rebate, including the seat the glass will sit on and the end grain in the corners, and let it dry properly before you glaze. Where an old rebate has been part-stripped or has weathered since it was primed, re-prime it. Hardwood rebates being finished clear should be sealed with a timber sealer instead.
Steel frames need to be sound, rust-free and primed too; putty over rust simply lifts with the rust.
Dry, clean and warm enough
Wipe any moisture out of the rebate — putty will not bond to damp timber, and trapped water behind a fillet is a rot machine. Brush out dust, old paint flakes and putty crumbs. Work between +5 °C and +30 °C; below about 5 °C the oxidation that cures the putty effectively stalls, which is why glazing on a cold, damp December afternoon so often disappoints.
A quiet trick: on a hot dry day, wipe the primed rebate with a rag lightly dampened in raw linseed oil before you glaze. It stops the timber taking the edge off the putty's oil in the first hours, and costs nothing.
Working the putty
Putty out of a fresh tub is usually close to right; putty from a tub that has been open, or one that has sat cold in a van, is not. Two failure states, and the fix for each:
- Too stiff and crumbly — knead it. Take a lump the size of a fist and work it in your hands until body heat softens it and it becomes plastic and slightly shiny. Two or three minutes of proper kneading transforms it. If it is still short and cracking, work in a few drops of raw linseed oil.
- Too soft and greasy — it has separated, and there is free oil on the surface. Roll it out on a sheet of clean brown paper or newspaper, which draws the excess oil off in a minute or two. Do not add whiting from a bag unless you know what you are doing; it is easy to make putty that will never cure properly.
Kneaded putty should hold a shape without slumping, feel like firm modelling clay, and leave your hands more or less clean. A cold tub in winter can be stood somewhere warm for an hour beforehand — not on a radiator, which cooks the surface.
Applying putty, step by step
The sequence below is for single glass in a primed timber rebate — the most common job by far. Two tools do almost all of it: a putty knife (a stiff, chisel-ended blade; the classic English pattern has a clipped point) and a hacking knife for removal.
- Bed the back putty. Run a continuous rope of kneaded putty around the whole rebate with your thumb, a few millimetres proud. Continuous is the operative word — every gap is a place for water to sit.
- Set the glass. Where the pane is large, drop in setting blocks at the quarter points of the bottom rebate so the glass rests on them rather than on the putty alone. Offer the pane up, press it home at the corners first and then work round the edges, squeezing the bed down to a consistent 1–2 mm. Press on the edges of the glass, never in the middle of the pane.
- Fix the sprigs. Drive small headless glazing sprigs into the rebate upstand roughly every 200–250 mm, and at least two per side on any pane. Slide the sprig along the glass with the flat of a firmer chisel and tap it in with the chisel blade lying on the glass — that way the tool cannot dip and strike the pane. Sprigs hold the glass; the putty is not the fixing.
- Front the fillet. Press fresh putty firmly into the rebate all round, over the sprigs, slightly overfilling. Work it in with your thumb so there are no voids behind it.
- Knife the bevel. Hold the knife at a shallow angle, one edge riding on the glass and the tip against the timber arris, and draw it along in one confident, continuous stroke per side. Aim to finish the putty face about 2 mm below the sight line so the fillet is invisible from inside and the paint has somewhere to land. Cut the corners last, mitring them cleanly. A knife wiped occasionally on a rag, or dipped in a little water, will not drag.
- Clean off the back bedding. Inside, knife away the squeezed-out back putty flush with the sight line, sloping away from the glass. Leaving it proud is the classic amateur tell.
- Brush the fillet. A soft brush, drawn along the fillet, closes the surface and beds the putty tight against both glass and timber. On a warm day a very lightly dampened brush works best.
- Clean the glass. Take off the smears now, while they are soft, with a dry cloth and a little whiting if you have it. Cured linseed smears are a genuinely miserable job to remove later.
Work all the way round in one session where you can. Putty has a working life of roughly four hours in the pot once opened, and joins between one session's putty and the next are visible for the life of the window.
The full removal-and-replacement sequence, including old glass and stubborn frames, is in our step-by-step guide to re-puttying a window.
Curing and painting — the schedule that actually matters
Putty is the rare material where the painting instruction is more important than the application instruction. Unpainted putty dries out, crazes, shrinks and lets go. Paint is not decoration here; it is the putty's weatherproofing.
| Stage | Typical timing | What you should see |
|---|---|---|
| Working time in the pot | ~4 hours | Stays plastic and knifeable |
| Skin forms | 2–4 days outdoors | Surface firm to a fingertip; no print left |
| First coat of paint | 7–21 days | Brush does not wrinkle or drag the surface |
| Final coat | within 28 days | Paint carried 1–2 mm onto the glass |
| Cures right through | months to years | Fillet hardens progressively; never fully brittle |
Cold, damp or shaded elevations stretch every one of those numbers — a north face in February can take three weeks to reach a paintable skin, and there is no way to hurry it. Warmth and moving air are what you want; a light breeze does more than a heat gun, which just skins the surface over a soft core.
Carry the paint onto the glass. A 1–2 mm overlap onto the pane is not sloppiness, it is the whole point: it closes the hairline joint between putty and glass, which is exactly where water would otherwise get in. Cut a crisp line with a good brush and take the excess off with a scraper once dry.
Use a flexible exterior finish — traditional oil-based systems and modern flexible acrylics both work; linseed oil paint is the historically correct partner and stays flexible for decades. Avoid hard, brittle films.
Do not leave putty unpainted "until next year". A single UK summer of direct sun on bare putty is usually enough to craze the fillet all the way through. If the job slips past 28 days, at least get a coat of primer on it.
More detail — including what to do when the weather refuses to cooperate — in painting glazing putty: when, and with what.
Lifespan and maintenance
Well-made putty on well-maintained joinery lasts a very long time. Fifty years is unremarkable; there are Georgian sashes carrying original fillets. But that lifespan is entirely conditional on the paint above it. The realistic cycle for a British window is:
- Every year: a two-minute look. Walk round and check the underside of each fillet, which is where water sits and where failure starts.
- Every 5–8 years: repaint, cutting in over the putty-to-glass joint each time. This is the single act that preserves putty.
- As needed: cut out and replace failed sections. Putty is designed to be repaired in patches; you almost never need to strip a whole window.
Hairline crazing in an otherwise sound, firmly attached fillet is not failure. Brush it down, prime it and paint over it. Some restorers revive a slightly tired but sound fillet by working a few drops of raw linseed oil into the surface before repainting.
Diagnosing a failed fillet
| What you see | What it means | What to do |
|---|---|---|
| Fine surface crazing, putty firm | Normal ageing of an unprotected surface | Clean, prime, repaint |
| A dark line opening between putty and glass | Paint has split; water is getting behind | Rake out the joint, re-face that run, repaint |
| Fillet loose but intact — lifts off in lengths | Oil starvation from an unprimed rebate | Remove, prime the bare rebate, re-putty |
| Fillet crumbles to powder | Long-term UV exposure, unpainted | Full removal and replacement of that pane's fillet |
| Glass rattles when you tap the frame | Sprigs missing or corroded, back bedding gone | Re-glaze the pane properly with new sprigs |
| Soft, greasy putty months after glazing | Wrong putty for the substrate, or applied too cold | Remove and redo with the correct type |
| Timber below the fillet is soft or dark | Water has been getting in for a while — rot | Deal with the timber first; putty over rot fails again |
Each of these is unpicked in why glazing putty cracks and falls out.
Re-puttying an existing window
The work is straightforward but unhurried. In brief:
- Soften first, chop second. Old putty on a period window can be rock hard. Warmth — a heat gun on a low setting kept moving, or an infrared softener — makes an hour's brutal chiselling into fifteen minutes of easy work. Keep heat off the glass, which will crack from thermal shock.
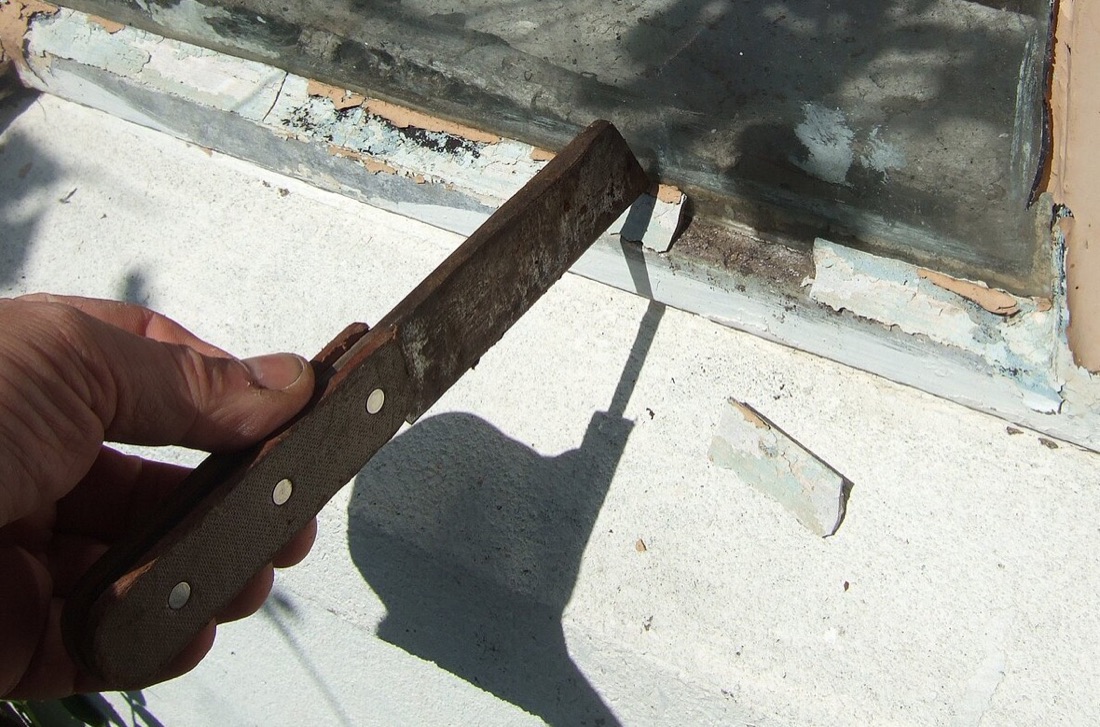
- Hack it out. Work the hacking knife into the joint and tap it down towards the frame, never towards yourself or across the pane. Take the fillet off in sections.
- Pull the sprigs. Pincers or fine pliers. Replace them; old sprigs are usually corroded.
- Clean back to sound timber. Every crumb of old putty out, then check the rebate for rot and repair it before going further.
- Re-prime and let it dry.
- Re-glaze as in the sequence above.
If the glass is staying in, you can re-face just the external fillet without disturbing the pane — cut the old putty out to the glass line, leave the back bedding alone, and knife a new fillet on. That single operation is most of what "window restoration" consists of.
Before you take a heat gun to a pre-1970s window: the paint over that putty is very likely lead-based. Heat and dust are exactly how lead gets into people. See safety below.
Listed buildings, conservation areas and period windows
On a historic window, putty is not merely a sealant — it is part of the appearance. A putty-glazed sash has a thin, tapered line at the glass edge; the same sash re-glazed with timber beads has a thicker, squarer one, and the change is visible from the street. That is why like-for-like re-puttying is the expected repair on a listed building or in a conservation area, and why substituting beads or silicone can be treated as an unauthorised alteration to a listed building.
Two practical points that come up constantly:
- Straight repair usually needs no consent. Renewing failed putty like-for-like is maintenance. It is changing the character of the glazing — beads instead of putty, a different glass, thicker glazing bars — that raises questions. Where a listed building is involved and the work goes beyond like-for-like, ask the conservation officer first; it is a free conversation.
- Historic glass is irreplaceable. Crown and cylinder glass, with its slight ripple, cannot be bought new. If you are hacking out around old glass, work cold-side first, take the extra hour, and accept that a cracked pane of 1820s glass is a genuine loss.
Sash-specific detail — parting beads, the order of work, and glazing sashes out of the frame on a bench — is in glazing putty for sash windows.
Buying, quantities and storage
Quantity. Reckon on 3–5 metres of fronting per kilogram, less on a deep rebate. Measure the perimeter of every pane you are doing, divide by four, and round up — running out mid-window is worse than a leftover tub. Back bedding adds roughly a third again.
Pack sizes. UK putty is sold in 0.5 kg, 1 kg, 2 kg and 5 kg packs, in natural (off-white) or brown. Colour is irrelevant under paint; brown is easier to live with on a dark-stained frame if the paint ever wears thin.
Freshness matters more than brand. Putty has a real shelf life and merchants' stock turns over slowly. A tub that has gone stiff and separated on the shelf can usually be brought back by kneading, but a tub that has skinned right through is scrap.
Storage. Air is the enemy. Press the surface flat, exclude air with a disc of polythene or greaseproof paper pressed directly onto the putty, and seal the lid. For longer storage, a thin layer of water over the surface keeps air off completely — pour it off and let the surface dry before kneading. A drop of raw linseed oil on the surface before sealing does the same job.
The full product landscape — every type side by side, and the specific products each row refers to — is on our putty comparison page.
Safety — three real risks, not a disclaimer
Linseed oil rags can catch fire on their own
This is not folklore. Oxidising linseed oil generates heat; a crumpled rag insulates that heat; the pile gets hotter until it ignites, with no flame or spark involved, sometimes within hours. Any rag, brush wipe or paper used with linseed oil or putty should be laid out flat to dry in the open, or dropped into a lidded metal container of water. Never leave a heap of oily rags in a bin, a bag or a van overnight.
Old putty and old paint may contain lead
Putty made before the 1960s can contain white lead, and paint on any window decorated before 1992 in the UK may be lead-based — the older the window, the more likely. Do not dry-sand, disc-sand or power-grind old putty or paint. Work wet, or use a controlled low-temperature infrared softener rather than an open flame; collect debris on sheeting; keep children and pregnant women away from the work; and wash thoroughly before eating. Some mid-century compounds also contained asbestos fibres, which is another reason never to create dust from unidentified old putty.
Glass
Hacking out puts a chisel millimetres from a brittle pane, often overhead. Gloves and eye protection, always. Tap towards the frame. Take old glass out in one piece where you can, and get panes above head height taken out by two people.
Myths worth retiring
- "Putty dries out." It cures by oxidation. What people call drying out is the oil being lost to bare timber or destroyed by UV — both preventable.
- "You should wait months before painting." The opposite. Paint as soon as the skin will take a brush; the manufacturers ask for the final coat within 28 days.
- "Putty holds the glass in." Sprigs hold the glass. Putty beds and seals it.
- "Any putty will do for double glazing." Linseed putty will destroy a sealed unit's edge seal.
- "Silicone is a modern putty." It cannot be knifed to a sharp arris and paint will not stick to it. It is a different material for a different detail.
- "Painting over the glass edge is bad practice." A 1–2 mm overlap is the specified detail.
- "Bare hardwood doesn't need priming." It needs sealing, for the opposite reason: it takes up so little oil that putty struggles to cure against it.
Frequently asked questions
How long does glazing putty take to dry?
It forms a surface skin in roughly two to four days in mild, dry weather, and that skin is what you paint. Full hardening right through the fillet takes months and never quite stops — linseed putty cures by absorbing oxygen, not by drying out.
When can I paint new putty?
As soon as the skin is firm enough to take a brush without wrinkling — usually 7 to 21 days, and manufacturers ask for the final coat inside 28 days. Waiting longer is not "safer": unpainted putty cracks.
Can I use linseed oil putty on double glazing?
No. The oil attacks the edge seal of a sealed unit and will fog it, often within a year or two. Sealed units are bedded on tape, silicone or a putty-replacement sealant instead.
Does putty go on the inside or the outside of the window?
Both, in different forms. A thin bed of back putty goes behind the glass, and the visible bevelled fillet goes on the outside face. On a traditional timber sash the fillet is external; you should see almost none of it from indoors.
Why does my new putty keep falling out?
Nine times out of ten the rebate was bare or badly primed, so the timber drank the oil out of the putty before it could cure. The other common causes are putty applied over damp wood, or putty left unpainted through a summer.
How much putty do I need?
Around 3 to 5 metres of fronting per kilogram, depending on how big the rebate is. Measure the perimeter of every pane, divide by four, and buy a little over.
Is old window putty dangerous?
Treat it as if it might be. Putty made before the 1960s can contain white lead, some mid-century compounds contained asbestos fibres, and the paint over it is very likely lead-based. Never dry-sand or power-grind old putty.
Can I just paint over cracked putty?
If the putty is sound and only hairline-crazed, yes — brush it clean, prime the cracks and paint. If it has shrunk away from the glass or the timber, paint bridges the gap for one winter and then splits. Cut those sections out and replace them.
This guide is maintained as an independent reference. We don't sell putty and we take no manufacturer sponsorship; the product links on our comparison page are Amazon affiliate links, which is how the site pays for itself. If something here is wrong or out of date, tell us and we'll fix it.